วันจันทร์ที่ 24 ธันวาคม พ.ศ. 2555

หาแฟ้มในแฮนดี้ไม่เจอ


หาแฟ้มในแฮนดี้ไม่เจอ แฟ้มในแฮนดี้หาย แฟ้มในแฮนดี้เปิดไม่ได้...


เคยใหมที่คุณประสบกับปัญหาดังกล่าว ข้อมูลที่เราเก็บมาเป็นเดือน เป็นปี ข้อมูลสำคัญๆ  งานด่วนที่อุตสาห์ทำแบบไม่หลับไม่นอน โปรแกรมสุดโปรดที่หายาก เพลงโปรดที่เราเก็บไว้ฟัง รูปภาพต่างๆที่ถ่ายมา อยู่ๆก็หายไปงั้นเลย ทั้งๆที่เราไม่ได้ฟอร์แมต แต่เมื่อตรวจสอบเนื้อที่ในแฮนดี้แล้วก็ยังกินเนื้อที่เหมือนเดิม และบางทีก็เห็นว่าไฟล์ยังมีอยู่ แต่ดันเปิดไม่ได้ ถ้าคุณเจอปัญหาดังที่กล่าวมาข้างต้นลองอ่านดูก่อนครับ เผื่อจะช่วยคุณได้


1. ไวรัสซ่อนข้อมูลของเรา เมื่อเราเอาแฮนดี้ไปเสียบที่เครื่องที่ติดไวรัสบางตัว มันจะเริ่มป่วนตั้งแต่ครั้งแรกที่มันตรวจเจอแฮนดี้ของเรา ไวรัสพวกนี้เที่ยวซ่อนไฟล์ และโฟลเดอร์ที่อยู่ในแฮนดี้ของเรา ทำให้เราหาไฟล์เหล่านั้นไม่เจอ นอกจากนั้น ไวรัสจะคัดลอกชื่อไฟล์ของเรา และสร้างตัวไวรัส หรือทางลัด(shotcut)เปิดไวรัส และใช้ชื่อแฟ้มของเรา เพื่อลวงให้เราเปิด หรือ สั่งงานให้ไวรัสทำงาน และติดในเครื่องนั้นได้
วิธีแก้

  • ให้อัพเดตแอนตี้ไวรัสและสแกนในแฮนดี้
  • ลองเปิดดูในแฮนดี้พบแฟ้มแปลกๆ ที่ไม่ใช่แฟ้มของเราให้ลบทิ้งเสีย
  • แฟ้มที่โดนไวรัสซ่อนปกติไวรัสจะตั้งค่าเป็นแฟ้มระบบ ทำให้เรามองไม่เห็น และไม่สามารถยกเลิกการซ่อนผ่าน Windows Properties ไม่ได้ แต่ท่านสามารถมองเห็น และเปิดได้กับโปรแกรมExplorerXP (คลิกที่นี่ เพื่อดาวน์โหลดโปรแกรม ExplorerXP เวอร์ชั่น Portable) หรือดาวน์โหลด ExplorerXP จากที่นี่ หรือดาวน์โหลดที่นี่
  • เพื่อให้แฟ้มและโฟลเดอร์ที่ถูกซ่อนแสดงกลับขึ้นมาเหมือนเดิมให้ไปที่ Start --> Run... (หรือกดแป้นบนคีย์บอร์ด Window Logo + R)และคัดลอกคำสั่งนี้ไปวางและกด Enter ต่อจากนั้นรอจนเสร็จ แฟ้มในแฮนดี้ของเราก็จะกลับสู่สภาพเดิม
    attrib -a -s -r -h C:\* /S /D
    * ให้แทนที่ไดรฟ์ของแฮนดี้ที่ต้องการจัดการ ตรง C:\ ตัวอย่างเช่นถ้าแฮนดี้อยู่ที่ไดรฟ์ E ให้คัดลอกโค๊ดนี้  attrib -a -s -r -h E:\* /S /D
    ถ้าแฮนดี้อยู่ที่ไดรฟ์ F ให้คัดลอกโค๊ดนี้  attrib -a -s -r -h F:\* /S /D
    ถ้าแฮนดี้อยู่ที่ไดรฟ์ G ให้คัดลอกโค๊ดนี้  attrib -a -s -r -h G:\* /S /D
    ถ้าแฮนดี้อยู่ที่ไดรฟ์ H ให้คัดลอกโค๊ดนี้  attrib -a -s -r -h H:\* /S /D
    ถ้าแฮนดี้อยู่ที่ไดรฟ์ I ให้คัดลอกโค๊ดนี้  attrib -a -s -r -h I:\* /S /D
    ถ้าแฮนดี้อยู่ที่ไดรฟ์ J ให้คัดลอกโค๊ดนี้  attrib -a -s -r -h J:\* /S /D


2. พื้นที่ในแฮนดี้ของเราเสีย จะทำให้แฟ้มของเราหายไปด้วย และถ้าเกิดปัญหานี้ท่านเปิดกับโปรแกรม ExplorerXP ก็ไม่เจอครับ แต่จะกินเนื้อที่ของแฮนดี้เหมือนเดิม บางทีเราอาจจะเห็นไฟล์ของเราแต่เปิดไม่ได้ ลบก้ไม่ได้ ขนาดของแฟ้มอาจจะเปลี่ยนแปลงจากเดิม หรืออาจจะเจอไฟล์แปลกๆที่ไม่สามารถลบได้ และจะมีขนาดใหญ่มาก บางทีอาจจะใหญ่กว่าที่แฮนดีจะรับได้ อย่างเช่น แฮนดี้ของเราจุ 4 GB แต่แฟ้มดังกล่าวกินเนื้อที่ 30GB เป็นต้น
วิธีแก้ 

  1. ให้ไปที่ Start --> Run... (หรือกดแป้นบนคีย์บอร์ด Window Logo + R)และคัดลอกคำสั่งนี้ไปวางและกด Enter
    chkdsk C: /F /R
    * ให้แทนที่ไดรฟ์ของแฮนดี้ที่ต้องการจัดการ ตรง C: ตัวอย่างเช่นถ้าแฮนดี้อยู่ที่ไดรฟ์ E ให้คัดลอกโค๊ดนี้  chkdsk E: /F /Rถ้าแฮนดี้อยู่ที่ไดรฟ์ F ให้คัดลอกโค๊ดนี้  chkdsk F: /F /Rถ้าแฮนดี้อยู่ที่ไดรฟ์ G ให้คัดลอกโค๊ดนี้  chkdsk G: /F /Rถ้าแฮนดี้อยู่ที่ไดรฟ์ H ให้คัดลอกโค๊ดนี้  chkdskH: /F /Rถ้าแฮนดี้อยู่ที่ไดรฟ์ I ให้คัดลอกโค๊ดนี้  chkdsk I: /F /Rถ้าแฮนดี้อยู่ที่ไดรฟ์ J ให้คัดลอกโค๊ดนี้  chkdsk J: /F /R
    ต่อจากนั้นโปรแกรมอาจจะถามก็ให้ตอบ Y และกด Enter และรอจนเสร็จ
  2. เมื่อโปรแกรมดำเนินการเสร็จแล้วก็ให้เปิดดูว่าแฟ้มเราทีหายไปนั้นกลับคืนมาหรือยัง ถ้ามีแล้วก็โชคดี ถ้ายังไม่มีก็
  3. ให้เปิดโปรแกรม ExplorerXP (คลิกที่นี่ เพื่อดาวน์โหลดโปรแกรม ExplorerXP เวอร์ชั่น Portable)  หรือดาวน์โหลด ExplorerXP จากที่นี่  หรือดาวน์โหลดที่นี่ และลองหาโฟลเดอร์ FOUND.000, FOUND.001, FOUND.002, ... มีอยู่ในแฮนดี้หรือเปล่า ถ้ามีก็แสดงว่าแฟ้มนั้นเสียและถูกซ่อมแซมและกู้คืนมาแล้ว อยู่ในโฟลเดอร์ดังกล่าวนั่นแหละครับ แต่แฟ้มทั้งหมดจะกู้มาเป็นแฟ้ม .CHK ทั้งหมดเลย
  4. ทีนี้ก็เป็นขั้นตอนในการเอาไฟล์ที่กู้มาใช้งานโดยไปที่ Run... และคัดลอกโคดนี้ไปวาง

    ren C:\FOUND.000\*.* *.jpg
    * ให้แทนที่ไดรฟ์ของแฮนดี้ที่ต้องการจัดการ ตรง C:\ ตัวอย่างเช่น
    ren F:\FOUND.000\*.* *.jpg 
    (กรณีแฮนดี้อยู่ไดรฟ์ F และโฟลเดอร์ FOUND.000)เปลี่ยนมุมมองให้เป็นแบบ Thumbnails ถ้าแฟ้มใหนเห็นตัวอย่างรูปภาพก็แสดงว่าแฟ้มดังกล่าวเป็นรูปภาพ

    ที่ผมพิมพ์คำว่า .jpg คือนามสกุลของรูปภาพ JPEG ซึ่งเราสามารถแยกแยะรูปภาพกับไฟล์อื่นๆได้ในมุมมอง  Thumbnails คือเราจะเห็นภาพตัวอย่าง

  ท่านสามารถแทนที่ .jpg ด้วยนามสกุลของแฟ้มต่างๆ ตัวอย่างเช่น
.mp3 แฟ้มเพลง mp3 จุดเด่นคือในมุมมอง Details แสดง Duration (เวลา), Bitrate,
.wma แฟ้มเพลง wma จุดเด่นคือในมุมมอง Details แสดง Duration (เวลา), Bitrate,
.mpg แฟ้มวีดีโอ จุดเด่นคือในมุมมอง Details แสดง Duration (เวลา), Bitrate, Demension ในมุมมอง Thumbnails จะแสดงตัวอย่างรูปภาพ
.wmv แฟ้มวีดีโอ จุดเด่นคือในมุมมอง Details แสดง Duration (เวลา), Bitrate, Demension ในมุมมอง Thumbnails จะแสดงตัวอย่างรูปภาพ
.mp4 แฟ้มวีดีโอ จุดเด่นคือในมุมมอง Details แสดง Duration (เวลา), Bitrate, Demension ในมุมมอง Thumbnails จะแสดงตัวอย่างรูปภาพ
.3gp แฟ้มวีดีโอ จุดเด่นคือในมุมมอง Thumbnails จะแสดงตัวอย่างรูปภาพ
.flv แฟ้มวีดีโอ จุดเด่นคือในมุมมอง Thumbnails จะแสดงตัวอย่างรูปภาพ
.doc แฟ้ม Word 2003 จุดเด่นคือในมุมมอง Details แสดง Author, Title,...
.docx แฟ้ม Word 2007,2010,2013 จุดเด่นคือในมุมมอง Details แสดง Author, Title,...
.ppt แฟ้ม PowerPoint 2003 จุดเด่นคือในมุมมอง Details แสดง Author, Title,... ในมุมมอง Thumbnails จะแสดงรูปตัวอย่าง
.pptx แฟ้ม PowerPoint 2007,2010,2013 จุดเด่นคือในมุมมอง Details แสดง Author, Title,... ในมุมมอง Thumbnails จะแสดงรูปตัวอย่าง
.pub แฟ้ม Microsoft Publisher 2003 จุดเด่นคือในมุมมอง Details แสดง Author, Title,... ในมุมมอง Thumbnails จะแสดงรูปตัวอย่าง
.pubx แฟ้ม Microsoft Publisher 2007,2010,2013 จุดเด่นคือในมุมมอง Details แสดง Author, Title,... ในมุมมอง Thumbnails จะแสดงรูปตัวอย่าง
.mdb แฟ้ม Access 2003 จุดเด่นคือในมุมมอง Details แสดง Author, Title,...
.mde แฟ้ม Access 2003 จุดเด่นคือในมุมมอง Details แสดง Author, Title,...
.accdb แฟ้ม Access 2007,2010,2013 จุดเด่นคือในมุมมอง Details แสดง Author, Title,...
.xls  แฟ้ม Excel 2003 จุดเด่นคือในมุมมอง Details แสดง Author, Title,...
.xlsx  แฟ้ม Excel 2007,2010,2013 จุดเด่นคือในมุมมอง Details แสดง Author, Title,...
.exe แฟ้มโปรแกรม จุดเด่นคือเราจะเห็นไอค่อนของโปรแกรมนั้นๆเลย
.zip แฟ้มบีบข้อมูล
.rar แฟ้มบีบข้อมูล
.pdf แฟ้มเอกสาร pdf จุดเด่นคือในมุมมอง Thumbnails จะแสดงรูปตัวอย่าง
.psd แฟ้ม Photoshop จุดเด่นคือเวลาเปิดใน ACDSee จะแสดงรูปตัวอย่าง
.swf แฟ้มแฟลช
.fla แฟ้มโปรเจคของแฟลช
.ai แฟ้ม Illustrator ในมุมมอง Thumbnails จะแสดงรูปตัวอย่าง

วันจันทร์ที่ 3 ธันวาคม พ.ศ. 2555

iTools โปรแกรมจัดการไฟล์บน iDevice ที่ง่ายกว่า iTunes สุดๆ


โปรแกรมสัญชาติฮ่องกงครับ การใช้งานก็คล้ายๆกับ iTunes แต่จะจัดการไฟล์ได้ดีกว่า
สามารถ install app ได้ delete หรือ backup ก็ได้ สามารถ import export 
เพลงและรูปภาพได้ ลบอัลบั้มได้
รวมไปถึงการจัดการไฟล์ประเภท system ของ iDevice ก็ได้ครับ ผมคิดว่ามันง่าย สำหรับบางคนที่ไม่ชอบอะไรที่ยุ่งยาก
ลองโหลดไปใช้กันดูนะครับ มีทั้ง version mac และ windows


วันอาทิตย์ที่ 18 พฤศจิกายน พ.ศ. 2555

30 Shortcuts Windows 8


รวมฮอต 30 Shortcuts Windows 8


ช่วงนี้ใครๆ ก็พูดถึงวินโดวส์ 8 กันมากขึ้น ทั้งปลื้มในประสบการณ์รูปแบบใหม่ ที่เปลี่ยนหน้าเปลี่ยนตาไป ขณะเดียวกัน ผู้ใช้อีกฟากก็ทรมานที่ไม่มี Stat Menu กินไม่ได้นอนไม่อิ่ม ต้อง feedback กลับไปท้วงติง MS เล่นเอาประธาน Sinofsky ติสก์แตกเซย์กู๊ดบายไมโครซอฟท์และคณะอย่างน่าใจหาย

อย่างไรก็ดีแม้กระแสตอบรับจะไม่ถือว่า Success มากนัก เมื่อนำไปเทียบกับวินโดวส์ในรุ่นก่อนๆ แต่นัมเบอร์ 8 รุ่นนี้ได้รับคำชื่นชมที่ดีจากบรรดาสื่อ ที่แน่นอนคือข้อมูลเรื่องความปลอดดภัยจากไวรัส ที่ผลการทดสอบจากBitDefender และ  Softpedia  บอกว่าทำได้ดีในตัวระบบปฏิบัติการณ์เอง

สำหรับผู้ใช้ที่บอกว่าการเรียกเมนูต่างๆ ของวินโดวส์รุ่นนี้ทำได้ยาก งง และไม่อิน ขอแนะนำตัวช่วยอย่าง 30 Shortcuts Windows 8 เหล่านี้ ไปเล่นกันดู !!


 30 Shortcuts Windows 8


Win + Print Screen – สร้างภาพสกรีนชอต  (เป็นไฟล์ .PNG )
Win + C – เปิด Charms Bar
Win + Tab – เปิด Switch List โปรแกรมที่ใช้งานอยู่ด้านซ้าย
Win + Q – เปิดเซิร์ช
Win + W – ค้นหาในส่วนของ System Settings
Win + F – ค้นหาไฟล์ในไดเร็กทอรี่  Files


Win + Z – Access Options ของ Metro Apps (หรือคลิกขวาในพื้นที่ว่าง)
Win + I – เปิด Settings Menu
Win + P – เปิด windows Screen ( สำหรับในงาน 2 จอ )
Win + H – ไปที่ Share Settings Pane
Win + K – เปิด Devices Settings Pane
Win + X – เปิด System Utility Settings Menu ในซ่อนอยู่มุมล่างซ้าย


Win + T – เปิดเมนู Windows ใน Taskbar
Win + U – เปิด Ease of Access Center
Win + E – เปิด Windows Explorer
Win + R – เปิด Run Dialogue Box
Win + Pause – เปิดหน้าต่าง System Properties
Win + Enter – เปิด Windows Narrator


Win + Shift + . – ดึงแอพพลิเคชั่นที่เปิดไว้แบบครึ่งจอขวา
Win + . – ดึงแอพพลิเคชั่นที่เปิดไว้แบบครึ่งจอซ้าย
Win + , – ส่อง Desktop
Win + D – ไปที่ Desktop
Win + M – ลดมุมมอง Applications
Win + B – กลับไปที่ Desktop


Win + J – สลับจอแอพลิเคชั่นที่ snapped ไว้
Win + L – Lock Screen
Win + Page Up/ Page Down – สลับดุหน้าจอ ( สำหรับผู้ใช้ 2 จอ )
Ctrl + Mouse Scroll (In Start Screen) – Tile Zoom Toggle
Ctrl + Mouse Scroll (In Desktop) – เปลี่ยนไซต์ Desktop Icon
Ctrl + Shift+ N – สร้าง Folder ใหม่ ในไดเร็กทอรี่ที่เปิดอยู่


วันจันทร์ที่ 12 พฤศจิกายน พ.ศ. 2555

วิธีเข้า Facebook สำหรับคนที่โดน block


วิธีเข้า Facebook สำหรับคนที่โดน block


facebook Page has been blocked. วิธีเข้า Facebook สำหรับคนที่โดน  block
Facebook Page has been blocked.
โดน Block Facebook ก็ยังเล่นได้
สำหรับวันนี้ผมมีเทคนิคดีๆมาแชร์สำหรับคนที่ติด Facebook แต่เมื่อเข้าไปทำงานที่ บริษัทแต่ทางฝ่าย ทีไอ ของบริษัทดัน บล็อค Facebook ไว้ ก็ทำให้เราไม่สามารถเข้าไปใช้งาน Facebook ได้ วันนี้ผมมีวิธีมาแก้การ บล็อค Facebook ซึ่งเราสามารถทำได้หลายวิธีเหมือนกัน เช่นจะเข้าผ่าน proxy แต่ข้อนี้จะมีข้อเสียคือ ช้า และไม่ปลอดภัย เมื่อเราใส่รหัสไปนั้นโอกาศถูกดักจับ User และ Password สูงครับ
สำหรับวิธีเข้า Facebook ตอนที่ถูกบล็อคจาก Admin ของผมนั้น ไม่ต้องเสี่ยง ไม่ต้องลงโปรแกรมใดๆเลย แต่เราจะเข้าผ่านหน้าแปลภาษา ของ Google
แต่ข้อเสียของมันก็คือ ช้า และใช้งานไม่ได้ 100% บางเมนูอาจะใช้งานไม่ได้ แต่ก็ยังพอใช้อ่าน และคอมเม้นต์เพื่อนๆของเราได้อยู่ครับ
เอาหละครับใครอยากรู้ทำอย่างไรมาอ่านกันเลยครับ
1.เข้าที่ไปหน้าแปลภาษาของ Google ก๊อบตรงนี้ไปได้เลยครับ http://translate.google.com/
block facebook2 วิธีเข้า Facebook สำหรับคนที่โดน  block
เว็บแปลภาษา
2.พิมพ์ www.facebook.com ลงไปในช่องแปลภาษา ด้านซ้ายมือ
block facebook3 วิธีเข้า Facebook สำหรับคนที่โดน  block
วิธีเข้า Facebook ที่โดนบล็อค
3.ให้กดลิงค์เข้าหน้า Facebook ด้านขวามือ
block facebook4 วิธีเข้า Facebook สำหรับคนที่โดน  block
จากนั้นก็รอ …….. แป๊บหนึ่งครับ ช้านิดแต่เล่นได้ชัวร์
4.ต่อจากนั้นก็จะขึ้นหน้านี้ให้ไปลิงค์ตรงคำว่า”ไปยัง Facebook.com ได้เลยครับ
block facebook5 วิธีเข้า Facebook สำหรับคนที่โดน  block
บล็อค Facebook โดน Block Facebook แก้ได้

วันอาทิตย์ที่ 28 ตุลาคม พ.ศ. 2555

วิธีทำ Hotmail ใช้ใน Outlook

Hotmail - เชื่อมต่อกับ Outlook

สำหรับผู้ที่มี Account mail ของ Hotmail สามารถนำ Email ของท่านมาใช้กับ Outlook ได้ โดยมีวิธีการ 2 วิธีดังนี้
วิธีที่ 1 ตั้งค่า Outlook แบบปกติ ให้กำหนด เพิ่มเติมดังนี้
- กำหนด POP3 เป็น :   pop3.live.com (Port 995 ssl)
- กำหนด SMTP เป็น :  smtp.live.com (Port 587 or 25 ssl)  : หมายเหตุ บางทีผมลองส่ง ก็ไม่ออก ไม่รู้เป็นไร
    หรือ กำหนด SMTP เป็นของ internet ที่เราใช้ (Port 25 ไม่ต้องเปิด ssl) (อันนี้ส่งออกแน่นอน) เช่น
Internet
SMTP
True
mail.truemail.co.th , classic.asianet.co.th , mxauth.truemail.co.th
TOT
smtp.totonline.net, smtp.totisp.net

วิธีที่ 2  โดยวิธีการ โหลดโปรแกรม Connector มาติดตั้งที่เครื่องเรา
Download Outlook Connector :
- สำหรับ windows 32bit
- สำหรับ windows 64bit (windows7 64bit)
เมื่อโหลดเสร็จแล้วก็ติดตั้งในเครื่อง ได้เลยครับ ... เมื่อติดตั้งเสร็จให้เปิด outlook ขึ้นมา

จะขึ้น POP UP Windows Live Hotmail setting ขึ้นมาให้เรากรอกรายละเอียด Email เรา
หากไม่ขึ้น ให้คลิ้กที่ Menu Qutlook Connector + Add a New Account ...

แล้ว OK เมื่อกรอกข้อมูลเสร็จ ใน Outlook ก็จะมี Folder ของ Email นั้นขึ้นมา (หากไม่มีอะไรผิดพลาด)

สำหรับผู้ที่ใช้ Outlook 2010
หากใช้ Version ตัว Office 2010 ก็ง่ายๆ เลยครับ Add Account ปกติ ได้เลยเพราะจะมีตัว Microsoft Outlook Hotmail Connector ให้อยู่แล้วในตัว ไม่ต้องติดตั้งเพิ่มครับ

วันพฤหัสบดีที่ 18 ตุลาคม พ.ศ. 2555

ลืมเปลี่ยนภาษา แก้ได้ด้วยโปรแกรมตัวนี้เลย " LayoutFix "


 ลืมเปลี่ยนภาษา ไม่อยากที่จะต้องมาลบแล้วพิมพ์ใหม่ โปรแกรมนี้ช่วยท่านได้
                                     
                                      
                                           Download


วันอังคารที่ 16 ตุลาคม พ.ศ. 2555

ขั้นตอนการกำจัด System progressive protection ให้สิ้นซาก

How to remove System Progressive Protection virus
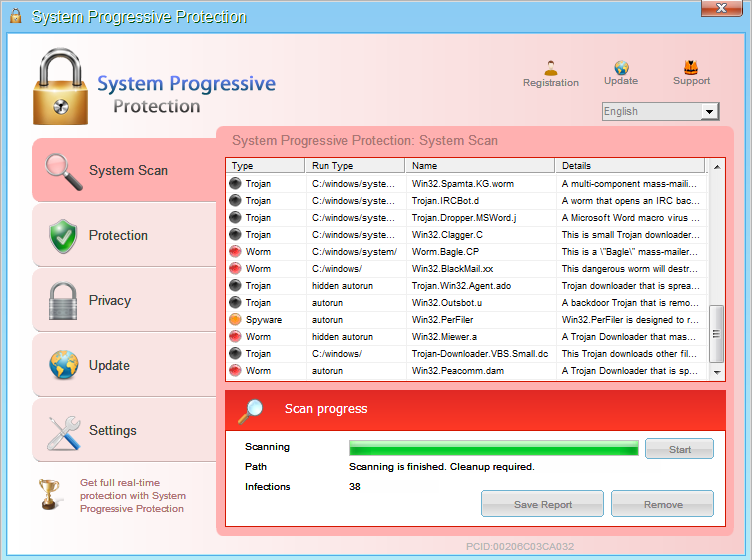
System Progressive Protection is a rogue security software which will display fake antivirus alerts,reporting that malware has been detected on your computer.This security alerts are professional looking pop-ups and when you click on them, you’re advised to buy System Progressive Protection in order to remove the detected threats.
In reality, none of the reported issues are real, and are only used to scare you into buying System Progressive Protection and stealing your personal financial information.

In addition,this malicious program is also causing browser redirects,system slowdowns and has hijacked your PC functions to block certain programs from running (eg: Task Manager,Registry Editor,Run command etc.).

We strongly advise you to follow our System Progressive Protection removal guide and ignore any alerts that this malicious software might generate.
Under no circumstance should you buy this rogue security software as this could lead to identity theft,and if you have, you should contact your credit card company and dispute the charge stating that the program is a scam and a computer virus.

System Progressive Protection virus

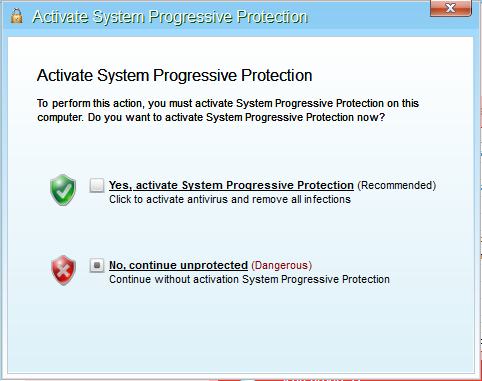
System Progressive Protection Activation Request

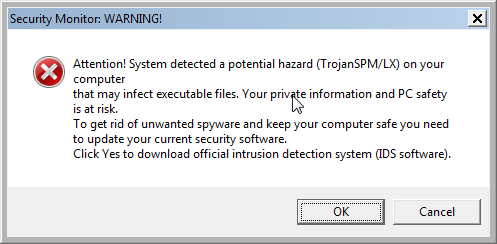
System Progressive Protection Warning


Registration codes for System Progressive Protection
As an optional step,you can use the following license key to register System Progressive Protection and stop the fake alerts.
AA39754E-715219CE
Please keep in mind that entering the above registration code will NOT remove System Progressive Protection from your computer , instead it will just stop the fake alerts so that you’ll be able to complete our removal guide more easily.

How to remove System Progressive Protection (Removal Instructions)


STEP 1 : Start your computer in Safe Mode with Networking


  1. Remove all floppy disks, CDs, and DVDs from your computer, and then restart your computer.
  2. Press and hold the F8 key as your computer restarts.Please keep in mind that you need to press the F8 key before the Windows start-up logo appears.
    Note: With some computers, if you press and hold a key as the computer is booting you will get a stuck key message. If this occurs, instead of pressing and holding the "F8 key", tap the "F8 key" continuously until you get the Advanced Boot Options screen.
  3. On the Advanced Boot Options screen, use the arrow keys to highlight Safe Mode with Networking , and then press ENTER.
    [Image: Safemode.jpg]

STEP 2: Repair your Windows Registry from System Progressive Protection malicious changes.


System Progressive Protection has changed your Windows registry settings so that when you try to run a executable file (ending with .exe ) , it will instead launch the infection rather than the desired program.
  1. Download the registryfix.reg file to fix the malicious registry changes from System Progressive Protection.
    REGISTRYFIX.REG DOWNLOAD LINK (This link will automatically download the registry fix called registryfix.reg)
  2. Double-click on registryfix.reg file to run it. Click "Yes" for Registry Editor prompt window,then click OK.
    [Image: fix registry]

STEP 3: Run RKill to terminate known malware processes associated with System Progressive Protection.


RKill is a program that will attempt to terminate all malicious processes associated with System Progressive Protection,so that we will be able to perform the next step without being interrupted by this malicious software.
Because this utility will only stop System Progressive Protection running process, and does not delete any files, after running it you should not reboot your computer as any malware processes that are configured to start automatically will just be started again.
  1. While your computer is in Safe Mode with Networking ,please download the latest official version of RKill.Please note that we will use a renamed version of RKILL so that System Progressive Protection won’t block this utility from running.
    RKILL DOWNLOAD LINK (This link will automatically download RKILL renamed as iExplore.exe)
  2. Double-click on the iExplore.exe icon in order to automatically attempt to stop any processes associated with System Progressive Protection.
    [Image: run-rkill-1.png]
  3. RKill will now start working in the background, please be patient while the program looks for various malware programs and tries to terminate them.
    [Image: run-rkill-2.png]
    IF you are having problems starting or running RKill, you can download any other renamed versions of RKill from here.
  4. When Rkill has completed its task, it will generate a log. You can then proceed with the rest of the guide.
    [Image: System Progressive Protection rkill3.jpg]
WARNING: Do not reboot your computer after running RKill as the malware process will start again , preventing you from properly performing the next step.

STEP 4: Remove System Progressive Protection malicious files with Malwarebytes Anti-Malware FREE


  1. Download the latest official version of Malwarebytes Anti-Malware FREE.
    MALWAREBYTES ANTI-MALWARE DOWNLOAD LINK (This link will open a download page in a new window from where you can download Malwarebytes Anti-Malware Free)
  2. Start the Malwarebytes' Anti-Malware installation process by double clicking on mbam-setup file.
    [Image: Malwarebytes Installer]
  3. When the installation begins, keep following the prompts in order to continue with the setup process. Do not make any changes to default settings and when the program has finished installing, make sure you leave both the Update Malwarebytes' Anti-Malware and Launch Malwarebytes' Anti-Malware checked. Then click on the Finish button. If Malwarebytes' prompts you to reboot, please do not do so.
    [Image: Finishing Malwarebytes installation]
  4. Malwarebytes Anti-Malware will now start and you'll be prompted to start a trial period , please select 'Decline' as we just want to use the on-demand scanner.
    [Image: Decline Malwarebytes trial]
  5. On the Scanner tab,select Perform full scan and then click on the Scanbutton to start scanning your computer.
    [Image: Starting a full system sca]
  6. Malwarebytes' Anti-Malware will now start scanning your computer for System Progressive Protection malicious files as shown below.
    [Image: Malwarebytes scanning for malicious files]
  7. When the scan is finished a message box will appear, click OK to continue.[Image: Malwarebytes scan results]
  8. You will now be presented with a screen showing you the malware infections that Malwarebytes' Anti-Malware has detected.Please note that the infections found may be different than what is shown in the image.Make sure that everything is Checked (ticked) and click on the Remove Selectedbutton.
    [Image: Infections found by Malwarebytes]
  9. Malwarebytes' Anti-Malware will now start removing the malicious files.After completing this task it will display a message stating that it needs to reboot,please allow this request and then let your PC boot in Normal mode.

STEP 5: Remove System Progressive Protection rootkit with HitmanPro


  1. This step can be performed in Normal Mode ,so please download the latest official version of HitmanPro.
    HITMANPRO DOWNLOAD LINK (This link will open a download page in a new window from where you can download HitmanPro)
  2. Double click on the previously downloaded fileto start the HitmanPro installation.
    [Image: hitmanpro-icon.png]
    IF you are experiencing  problems while trying to starting HitmanPro, you can use the "Force Breach" mode.To start this program in Force Breach mode, hold down the left CTRL-key when you start HitmanPro and all non-essential processes are terminated, including the malware process. (How to start HitmanPro in Force Breach mode - Video)
  3. Click on Next to install HitmanPro on your system.
    [Image: installing-hitmanpro.png]
  4. The setup screen is displayed, from which you can decide whether you wish to install HitmanPro on your machine or just perform a one-time scan, select a option then click on Next to start a system scan.
    [Image: hitmanpro-setup-options.png]
  5. HitmanPro will start scanning your system for malicious files. Depending on the the size of your hard drive, and the performance of your computer, this step will take several minutes.
    [Image: hitmanpro-scanning.png]
  6. Once the scan is complete,a screen displaying all the malicious files that the program found will be shown as seen in the image below.After reviewing each malicious object click Next.
    [Image: hitmanpro-scan-results.png]
  7. Click Activate free license to start the free 30 days trial and remove the malicious files.
    [Image: hitmanpro-activation.png]
  8. HitmanPro will now start removing the infected objects, and in some instances, may suggest a reboot in order to completely remove the malware from your system. In this scenario, always confirm the reboot action to be on the safe side.

STEP 6: Double check for other malicious files with Emsisoft Emergency Kit


  1. You can download the latest official version of Emsisoft Emergency Kit from the below link.
    EMSISOFT EMERGENCY KIT DOWNLOAD LINK (This link will open a download page in a new window from where you can download Emsisoft Emergency Kit)
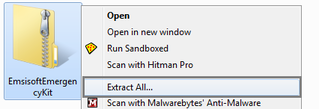
  2. After the download process will finish , you'll need to unpack EmsisoftEmergencyKit.zip
    Unpack Emsisoft Emergency Kit
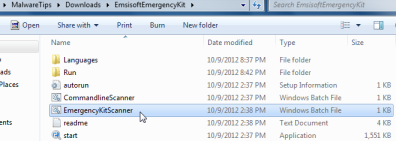
  3. Open the Emsisoft Emergency Kit folder and double click EmergencyKitScanner.bat.
    Click on EmergencyKitScanner.bat
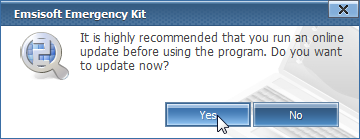
  4. A pop-up will prompt you to update Emsisoft Emergency Kit,and you'll need to click the Yes button to allow this request.
    Update Emsisoft Emergency Kit
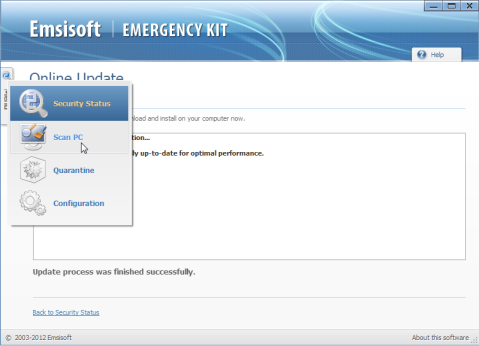
  5. After the Update process has completed,click on the Menu tab and then select Scan PC.
    Scan tab on Emsisoft Emergency Kit
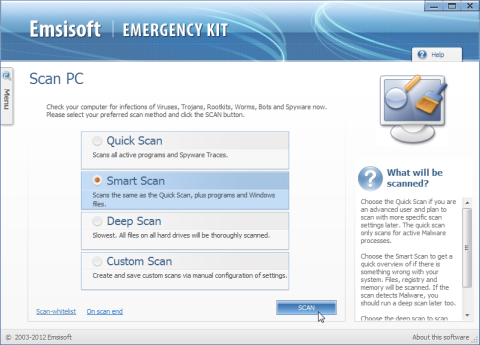
  6. Select Smart scan and click on the SCAN button to search for System Progressive Protection malicious files.
    Emsisoft Emergency Kit smart scan
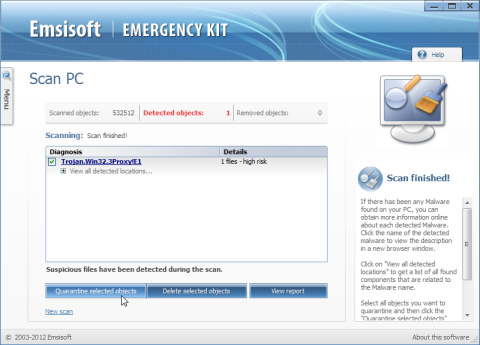
  7. Emsisoft will now start scanning your computer for malicious files.When the scan will be completed,you will be presented with a screen showing you the infections that Emsisoft has detected.
    Make sure that everything is Checked (ticked) and then click on Quarantine selected objects.
    Emsisoft smart scan results
  8. Emsisoft Emergency Kit will now start removing the malicious files.If during the removal process Emsisoft will display a message stating that it needs to reboot, please allow this request.


วันพฤหัสบดีที่ 13 กันยายน พ.ศ. 2555

วิธีเปลี่ยน product key ใน Microsoft Office xp 2003,2007,2010 โดยไม่ต้องลงใหม่


การเปลี่ยน product key ใน Microsoft Office โดยที่ไม่ต้องถอดโปรแกรมออก ติดตั้งใหม่ เพียงเพื่อจะใส่ product key ชุดใหม่ เนื่องมาจาก product key นั้นหมดอายุ หรือได้ product key อันใหม่มา

Office XP:

คลิก Start->Run พิมพ์ Regedit เขัาไปที่คีย์
[HKEY_LOCAL_MACHINE\SOFTWARE\Microsoft\Office\10.0\Registration]

คลิกเครื่องหมาย + หน้า Registration คลิกที่ตัวเลข {xxxxxxxx-xxxx-xxxx-xxxx-xxxxxxxxxxxx} แถวแรก


ด้านขวา มองหาคีย์ DigitalProductID และ ProductID แล้วทำการลบทิ้ง


จากนั้นเปิดโปรแกรม word, excel อื่นๆ แล้วจะมีหน้าต่างโผล่ขึ้นมาให้ใส่ product key ทำการใส่ product key อันใหม่ เสร็จแล้วคลิก ok

Office 2003:

คลิก Start->Run พิมพ์ Regedit เขัาไปที่คีย์
[HKEY_LOCAL_MACHINE\SOFTWARE\Microsoft\Office\11.0\Registration]

คลิกเครื่องหมาย + หน้า Registration คลิกที่ตัวเลข {xxxxxxxx-xxxx-xxxx-xxxx-xxxxxxxxxxxx} แถวแรก

ด้านขวา มองหาคีย์ DigitalProductID และ ProductID แล้วทำการลบทิ้ง

จากนั้นเปิดโปรแกรม word, excel อื่นๆ แล้วจะมีหน้าต่างโผล่ขึ้นมาให้ใส่ product key ทำการใส่ product key อันใหม่ เสร็จแล้วคลิก ok


Office 2007:

คลิก Start->Run พิมพ์ Regedit เขัาไปที่คีย์
[HKEY_LOCAL_MACHINE\SOFTWARE\Microsoft\Office\12.0\Registration]

คลิกเครื่องหมาย + หน้า Registration คลิกที่ตัวเลข {xxxxxxxx-xxxx-xxxx-xxxx-xxxxxxxxxxxx} แถวแรก

ด้านขวา มองหาคีย์ DigitalProductID และ ProductID แล้วทำการลบทิ้ง

จากนั้นเปิดโปรแกรม word, excel อื่นๆ แล้วจะมีหน้าต่างโผล่ขึ้นมาให้ใส่ product key ทำการใส่ product key อันใหม่ เสร็จแล้วคลิก ok

ปล ... ก่อนกระทำการใดๆ ควร backup คีย์เก็บไว้ก่อน เผื่อ product key อันใหม่ใช้ไม่ได้ ยังสามารถกลับไปใช้ product key อันเดิมได้โดยไม่มีปัญหา

คลิก Start->Run พิมพ์ Regedit เขัาไปที่คีย์

Office XP:
[HKEY_LOCAL_MACHINE\SOFTWARE\Microsoft\Office\10.0\Registration]

Office 2003:
[HKEY_LOCAL_MACHINE\SOFTWARE\Microsoft\Office\11.0\Registration]

Office 2007:
[HKEY_LOCAL_MACHINE\SOFTWARE\Microsoft\Office\12.0\Registration]


แล้วคลิกขวาที่ Registration เลือก Export ตั้งชื่อ แล้วคลิก Save

การคืนค่า : product key อันเดิม ดับเบิ้ลคลิกไฟล์ที่ backup เก็บไว้ แล้วคลิก ok

Product key microsoft office 2010

าวิธีการเปลี่ยน Product key microsoft office 2010 ครับ ง่้่ายๆครับ เพียงไม่กี่คลิกก็เปลี่ยนได้แล้วครับ ไม่ต้องลบแล้วลงใหม่เลยครับ เราจะได้ใช้ outlook2010 ,microsoft word 2010,microsoft excel 2010 กันได้อย่างสบายๆ โดยไม่มี Pop-up ถามเรื่อง License สำหรับคนที่มีปัญหากับ Microsoft office 2010 ในเวลาเปิดโปรแกรมขึ้นมา โดยส่วนมากจะมีปัญหากับคนที่ชอบหา License ตาม Internet

การเปลี่ยนนั่น เราจะเปิดตัวไหนก็ได้ Outlook2010 , word 2010, excel 2010 ขึ้นมาก็ได้ครับ แล้วแต่ ในรูปผมเปิด Outlook 2010 อยู่พอดีเลย


วิธีการเปลี่ยน Product key microsoft office 2010 ทำได้ดังนี้

1. ตอนแรกให้เรามาดูที่ File > help กันก่อนนะครับ ว่า Microsoft office ของเรา Active ยัง ในรูป Active แล้วนะครับ แต่ถ้าไม่ได้ Active มันจะขึ้น non - active

และทำการดู version ด้วยว่าเป็นอะไร ในรูปเป็น Microsoft office Professional Plus 2010


2. ให้ไปที่ Control Panel จากนั้นเลือก Uninstall Program


3. จากนั้นเอาเมาส์ไปไฮไลท์ที่ Microsoft Office Professional และกด Change

4. ให้เลือก Enter a Product Key จากนั้นให้เราใส่ Key Microsoft office 2010 ลงไป และกด OK ครับ

แค่นี้เราก็ได้ทำการเปลี่ยน Product key ของชุด Microsoft office 2010 แล้ว

หมายเหตุ

การเอา Product key มาใส่ควรใส่ให้ตรงกับ Version ของ Micorosoft office 2010 ของท่านด้วยนะครับ

ส่วน Product key admin office ส่วนใหญ่ก็มีอยู่ในมือแล้วเนอะ